Establish patency by negotiating canal 1mm through root end using Lexicon® .08 and .10 stainless steel hand files, lubricated with ProLube® root canal conditioner. The goal is to get a .15 stainless steel hand file to length before rotary shaping.
Shape canal – Crown Down
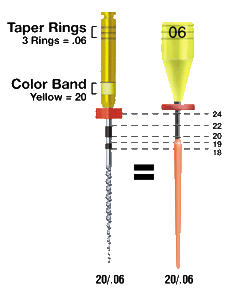
Always begin crown down with the GT 20 series, .10 taper file (20/.10) at 300 RPM.
When resistance is met, the file will no longer passively make apical progress and less debris will accumulate in the flutes as the file is removed for cleaning. At this point, move to 20/.08 file.
Again, when resistance is met on the 20/.08, move to the 20/.06 file.
Continue this sequence to working length. Do not force any file to length.
Once at length, if greater taper is desired, move back up to the next larger taper in the 20 series and work passively to length
Do not take any file larger than .08 taper around curvatures
Use apical gauging to verify apical diameter
Gauge Apex/adjust shape
This involves taking a series of Lexicon NiTi hand instruments (20, 30 and 40) into the canal to measure the terminal diameter of the canal. When the gauging file that binds at length has the same tip diameter as the largest GT file taken to length, the shape is finished.
Begin with the size 20 NiTi hand file and take it to length.
If it binds at length, drop in the size 30, which should come short of working length. If it does, apical gauging is complete, and your shaping is done.
If the size 20 hand file doesn’t bind at length, take the size 30 to length.
If the size 30 hand file binds at length and the size 40 comes short of length, then select a size 30 GT rotary file that has the same taper last taken to length when shaping with the 20 series. This file should go to length easily.
If the 30 hand file doesn’t bind at length and the 40 does, then take the size
40 GT rotary file that has the same taper last taken to length when shaping with the 20 series. This file should go to length easily.
As a final step, confirm the apical diameter by repeating the gauging process by, once again, taking the 20, 30 and 40 hand files to length.
If additional coronal flaring is desired, use a GT 40/.10.
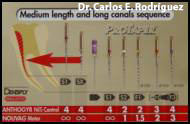
SISTEMA PRO-TAPER (Dentsply/Maillefer.)
El sistema Pro-Taper es el mas reciente lanzamiento de Dentsply-Maillefer. Los instrumentos de níquel-titanio ofrecidos por este sistema presentan sección transversal convejo de arestas redondas (Fig No. 28) y ángulo de corte ligeramente negativo, así como se observa en un solo instrumento varias conicidades, reduciendo la cantidad de instrumentos a utilizar y convertir mas corto el procedimiento clínico; constituyéndolo como una novedad en el mercado de la odontología moderna. (4,7,17)
En estudios realizados por Yun y colaboradores en el 2003, comparando las cualidades de cuatro diferentes sistemas de limas rotatorias de níquel-titanio en la conformación de canales radiculares curvos, encontraron que el sistema de limas rotatorias Pro-Taper fue el más eficiente en corte, con un mínimo tiempo de trabajo manteniendo la forma original del conducto. (17)
Este sistema de instrumentos posee la ventaja que facilitan el uso de la técnica Crown-Down mejorando el acceso al sistema de conductos radiculares. (17)
TÉCNICA Y SECUENCIA DE USO.
Según el fabricante, existen dos secuencias a seguir para una correcta instrumentación a partir de la longitud de los conductos radiculares ya sean cortos, medianos o largos.
Para sistemas de conductos radiculares medianos y largos la secuencia preconizada es la siguiente:
Instrumento S1 hasta el tercio medio del conducto radicular.
Instrumento SX hasta el tercio medio del conducto radicular.
Lima manual tipo K o Flexofile de pequeño diámetro inicial (No. 10 o 15) hasta alcanzar la longitud real de trabajo.
Instrumentos S1, S2, F1, F2 y F3 hasta alcanzar la longitud real de trabajo.
El sistema Pro-Taper puede ser utilizado en cualquier motor eléctrico, pero según las especificaciones del fabricante, este sistema fue preconizado para su uso con el motor Tecnika. La velocidad de rotación recomendada varia entre 250-300 rpm. (4,22)